
Canvassing using RunningMate
How do I canvass using RunningMate?
Watch this video below to learn more - from list creation, to creating a canvassing program, to canvassing via your mobile device.
No apps or downloads required! Simply visit app.runningmate.io via a web browser on your mobile device and start talking to voters. RunningMate now has three modes by which to log your contact with people - Search Individuals, Canvassing, and Phone Banking.
Canvassing

Standard and Plus RunningMate users are able to canvass from a program they have created. This allows assigned volunteers to perform in-person outreach to a targeted audience via the Canvassing functionality.
Survey responses logged during a Canvass that are within a program which includes a Phone Banking component will be reflected within the Phone Banking targets, and vice versa. For example, if a volunteer calls someone within a Program, it will reflect that the person has been contacted and show their survey responses, tags, and notes if someone were to look at the same voter within Canvassing. This can help save time and reduce the likelihood that someone is contacted multiple times within the same Program.
How to Start Canvassing
Canvass setup:
- First, an account owner, admin, or data manager should create a Universe Home page.
- Save the list, giving it a name.
- Click Create Program in the upper righthand portion of the page.
- Edit the necessary details of the program, including the optional description, optional start and end dates, Survey Questions, Integrations, Canvassing, and Phone Banking.
- Click Canvass Setup
- Choose whether to break the list up by precinct or by geographic clustering.
- For Geographic Clustering: Add the number of households you would like included in each packet, then select the List the Program will be associated with. This will geographically break the list down into packets automatically and attempt to cluster the targets together.
- Note that if a packet is larger than 2,500 targets, it will not packet the list. You will need to divide the list into more packets, so they have fewer targets.
- Packet Visualizer in Canvass Setup allows users to see where the packets are within the selected district.
- Assign the packets to canvassers OR download and print the walk packets. Both of these functions can be found in the Canvass Setup portion of Programs, next to the relevant canvassing packet.
- Edit the packets as-needed, moving households into a different packet, or removing certain targets from a packet.
- Publish and Save the program.
Canvassing in the field:
- Log in to RunningMate via a web browser on your mobile device
- Click Canvassing from the lefthand menu, under Outreach
- Select the Program from which to Canvass
- Choose a Packet from which to Canvass
- The packets visible to each user will be the ones they have been assigned. If a user is expecting to see packets, check first if they have them assigned under the Canvass Setup portion in the Program.
A couple of notes for account owners, admins, and data managers:
1️⃣ First, before your first canvassing event, be sure you've created tags for any data point you'd like to collect while in the field. A few examples are:
- Priority issues,
- First time voter,
- Needs a yard sign,
- Donor,
- Wants to volunteer, etc.
2️⃣ Second, be sure canvassers have been added to the RunningMate workspace.
More details on using RunningMate to Canvass from a mobile device:
- Log in to RunningMate via a web browser on your mobile device.
- Select Canvassing from the lefthand menu.
- Choose one of the programs to canvass from, then choose a packet.

- Once a user selects a packet, the targets within the list will load in a list view. The targets will be sorted by street address
- In this list view there is also an indicator of total targets on the list and how many have been canvassed so users can gauge progress of their canvassing effort - e.g. 73/191 Voters Contacted
- 20 targets will display at a time, but can choose to view to other pages of the contact list
- Users can toggle between list and map view via the tabs at the top of the list
- Users are able to search by name or street address for a specific target in list and map view
- When in Map View, if the canvasser's location services are turned on, they will see their dot on the map move as they canvass houses.
- Select a target to canvass. Once user selects a target they will see additional information about the target along with a “Start Conversation” and “Voter Unavailable” button.
- Users can also select a target via the map, which will display the target info once the map marker is tapped
- If user selects a map marker with more than one target user will be directed to a list of the targets that is associated with that marker and can select which one to canvass
- Information shown for a target includes:
- Registration Status
- Party Registration
- Party Lean
- Vote History
- Precinct
- Current Support Score
- If one exists, it will be shown but won’t be editable in the info panel. User must use the “Start Conversation” workflow to log a new support score.
- Current Voter Registration Intent
- If one exists, it will be shown but won’t be editable in the info panel. User must use the “Start Conversation” workflow to log a new registration intent.
- Tags
- Notes
- Users can also select a target via the map, which will display the target info once the map marker is tapped
- If the target is available, select “Start Conversation” button to log either a support score or registration intent response, or both
- Only one response is required to log a successful contact attempt
- Registration intent question only displays if:
- Target is unregistered and the account is a Pro+ account (meaning they have access to unregistered data in RunningMate)
- User must click “Submit Survey” in order to save their input
- Users can edit the responses if needed. The “Start Conversation” button will change to “Edit Conversation” once a response has been logged.
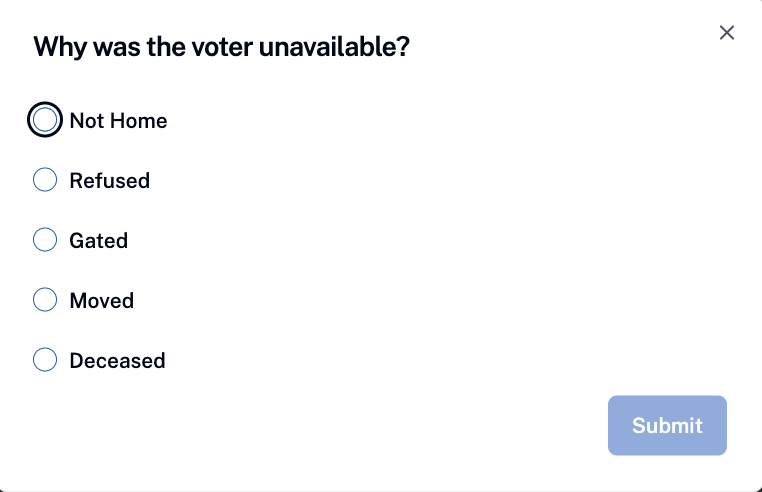
- If the target is not available, select the “Voter Unavailable” button to log a non-contact result. Available options are as follows:
- Not Home
- A contact attempt will be marked as being made, but not as completed. This target will be marked as still available to be canvassed.
- Refused
- Canvassing status for this target will be considered complete
- Moved
- Canvassing status for this target will be considered complete
- This is also considered a terminal non-contact code/status. In the near future, targets with this status will not show up in future lists in the context of canvassing. The exclusion will be applied at the workspace level.
- Deceased
- Canvassing status for this target will be considered complete
- This is also considered a terminal non-contact code/status. In the near future, targets with this status will not show up in future lists in the context of canvassing. The exclusion will be applied at the workspace level.
- Gated
- Canvassing status for this target will be considered complete
- Not Home
- To move on to the next target, click the “Back” link located near the top to return to the previous screen and select a new target to canvass
Note: Canvassing is also accessible on larger screens or desktop, which will function similarly to mobile except that the list and map view is presented side by side on the screen vs in tab view in mobile.
Canvassing Status
There are three canvassing statuses that a target can have. Status is indicated on the list view.
- Not Canvassed - Green
- Target is available to be canvassed
- Canvassed and successful contact attempt was logged or target marked with a terminal non-contact code - Grey
- Target is marked as complete and does not need to be canvassed
- Canvassed but successful contact attempt was not made - Yellow orange
- Target was marked as not home and still available to be canvassed
Canvassing statuses are also indicated on the map via the same color codes above, but indicate status based on “household” or targets grouped by geolocation.
- Green marker – No contact attempts made at the household yet, and they are available to be canvassed.
- Yellow marker – At least one attempt made, but some residents are still unresolved (e.g., "not home" or no response code recorded for at least one target). Canvassing effort is not yet considered complete.
- Gray marker – All residents in the household are resolved through terminal codes or survey completion and canvassing effort is considered complete.

The canvassing statuses and color codes are meant to give the user a quick indicator of what targets are available to be canvassed or still need to be canvassed, and what is complete.
Editions and Roles and Permissions
Editions that have full access to canvassing:
- Pro
- Pro+
Simulator accounts allows users to explore RunningMate Pro functionality using realistic synthetic data for their selected district.
Roles that can access and use Canvassing:
- Owner
- Admin
- Data Manager
- Volunteer
Roles with view only access:
- Data Viewer
Search Individuals

After clicking Outreach, users can select Search - doing so allows users to search a name or address, then view that person's registration status, party registration (where applicable), partisanship lean, etc. They can then update the person’s survey responses as well as to add data tags and free-form notes.

What are the Mobile Version Limits?
- State view users will not be able to drill down into specific geographies when logged in via a mobile device. When performing a search, it will search against the entire state.
Please note that workspace admins and data managers will need to set up tags for their users to access while canvassing. Tags can be added by clicking into the Data Management screen, then selecting Tags, or by importing a csv containing Tags.

Printable Packets and Data Entry UI
Some campaigns want to use printed canvassing packets instead of using mobile devices. This could be due to preferences or due to poor cellular signal in canvassing areas that make using mobile devices impractical. This feature gives our users the option to download their packets in a PDF format for printing. There will also be a data entry interface that users can enter the data back into RunningMate.
To download a canvassing packet for printing go to Programs > Canvass setup.
- Owners, Admins and Data Managers are able to download packets
- Users are able to download a PDF packet one packet at a time by clicking the “Download PDF” button for that packet
- Users are able to download via their mobile device as well
- Users can also bulk download multiple packets at once by selecting the desired packet via checkbox and clicking the bulk download option (icon next to “Selected Packets (#) text)
- If user downloads multiple packets at a time, a zip file will be downloaded onto the users computer and the individuals packets will be within that zip file
- Note: Bulk downloads are only available for programs with less than 100 packets. This is due to a scaling issue, which we plan to address post election
- Users who have more than 100 packets in their program will not see an option for bulk download
- If user downloads multiple packets at a time, a zip file will be downloaded onto the users computer and the individuals packets will be within that zip file
- PDF packets are cached for one hour after download
- This means that any updates to voters within the packet won’t be reflected in the printable packet until one hour after the user initially downloaded the packet.
- After one hour if a user downloads the packet again the system will go check for updates to any voters in the packet, so that the canvasser will have the most up to date information
Print Packets Structure
- Title page will contain instructions on how to use the packet, survey question, party affiliation, and non-contact code keys
- The title page heading will show showing the program name, packet name, and the date the packet was downloaded
- Each page will contain either odd or even number households, which will be indicated at the top of the page
- This is so canvassers don’t have to cross the street while canvassing
- The order for each page will be organized by street address
- Voters will be grouped by households
- Different households will be clearly separated on the page
- Each voter on the page will be numbered allowing for easy matching while doing data entry into RM
- Numbering resets for each page
- For each voter the print packet will display:
- Name, sex, age, and registration status (found underneath their name)
- Their party affiliation (see Party column)
- Any prior support score (see Prior Sup. column)
- This will be their current support score, if one exists
- Area to mark a support score
- Area to mark registration intent if the person in question is unregistered (otherwise this survey question will not appear)
- Area to mark a non-response code
Data Entry Interface
Along with the printable packets, RunningMate now has a data entry interface that matches the order and structure of the print packets making data entry a smooth process for our users.
- Access the data entry interface by going to Programs > Canvass Setup > Finding the packet you want to enter data for and clicking on the pencil icon (enter data icon)
- The “Enter Data” icon is disabled if the packet has not been downloaded
- Currently there is no mobile support for the data entry interface and the enter data icon is hidden on mobile
- Owners, Admins, and Data Managers are able to access and input data through the data entry interface
- Voters appear in the same order as they do on each page of the printed PDF packet
- For example if page 1 of your print packet shows John Do and Jane Do, RM will also display John Do and Jane Do on page 1 and in the same order as its shown in the print packet.
- This allows the user to easily match the voter and enter the data
- Note: For now users will not be able to enter tags or notes for voters as this was deferred in favor of getting something out to production. We will be doing a follow up post election to add the ability to add note and tags in the data entry interface
- Voter registration data entry should only appear if the voter is a registration target (e.g. an unregistered person)
- Note this question may show up even if the voter is a registered voter. It has been logged as a bug and will be fixed post election.
- Non-response codes and survey responses are mutually exclusive
- User must click save to save their data before moving to the next page and a prompt will display if user tries to navigate away before saving
- You do not need to provide a response for each voter on the page to save or move onto the next page